Back to School Notebook: A Designer’s Stitch Test
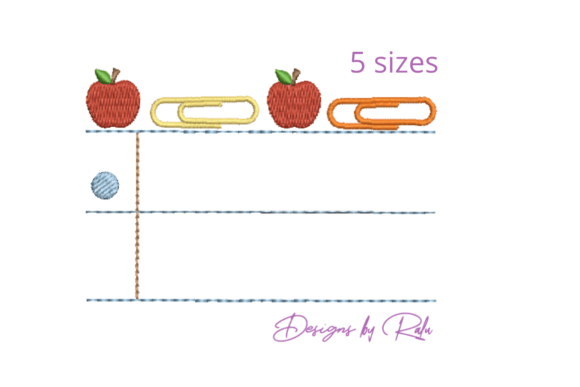
As a professional embroidery designer and product reviewer, I approach every new machine embroidery design with a critical eye. It is not enough for a graphic to look appealing on a screen; it must translate beautifully through needle and thread. When evaluating the Back to School Notebook design, my primary focus was on its utility as a functional template rather than just a decorative element. This design features a filled notebook page complete with apples and paper clips, specifically structured to serve as a backdrop for personalization. For Etsy sellers, craft business owners, and makers creating custom apparel or school supplies, this distinction between decoration and utility is what determines whether a product becomes a bestseller or sits unsold.
First Impressions and Visual Hierarchy
Upon loading the embroidery file into my software, the layout immediately communicated a nostalgic yet organized academic aesthetic. The visual weight is balanced carefully; the apples and paper clips act as anchor points without overwhelming the central negative space intended for names. In embroidery, negative space is just as important as stitched areas because it prevents the design from becoming bulletproof or distorting the fabric. The Back to School Notebook succeeds here by using fill stitch techniques that provide coverage without excessive density. The mood is undeniably scholastic, making it an intuitive choice for Back To School merchandise, teacher appreciation gifts, or student organization products. As a digital embroidery file, it respects the boundaries of the hoop while maximizing the usable area for customization.
Real-World Application: The Custom Tote Bag Test
To truly evaluate this asset, I applied it to a real-life scenario relevant to many handmade product creators: a personalized canvas tote bag for a middle school student. Canvas is a forgiving fabric, but it requires precise stabilization to prevent puckering around detailed elements like the paper clips. I chose this project because tote bags are high-volume items for small shop product lines during late summer.
During the stitching process, I observed how the design handled the transition between the notebook lines and the decorative accents. The stitch density was appropriate for the canvas weight, allowing the fabric texture to remain visible rather than being completely buried under thread. This is crucial for maintaining the tactile quality of a finished product. When adding a name in a complementary font, the pre-stitched notebook background provided a perfect guide for alignment. For commercial embroidery workflows, this built-in structure reduces setup time and minimizes alignment errors, which directly impacts profit margins. The resulting bag looked professional and intentional, not like an afterthought. Customers perceive this level of cohesion as higher value, justifying a premium price point for personalized gift items.
Fabric Compatibility and Stabilization Strategy
While the Back to School Notebook performed excellently on canvas, designers must exercise caution when selecting substrates. The design contains multiple elements that interact differently depending on fabric texture.
- Stretchy Fabrics: If applying this to a sweatshirt or t-shirt, you must use a high-quality cut-away stabilizer. The combination of fill stitches and potential satin borders can cause tunneling on knits if the fabric is not adequately supported. Always test on scrap material first.
- Textured Surfaces: On terry cloth towels or fleece blankets, the finer details of the notebook lines may get lost. Consider using a water-soluble topping to keep the stitches crisp and visible above the pile.
- Dark Fabrics: Since this is a notebook page template, it likely relies on white or cream thread for the paper effect. On dark garments, ensure your underlay is sufficient to prevent the fabric color from bleeding through the fill stitch areas.
- Sheer or Thin Materials: Avoid using this design on lightweight voile or organza unless heavily stabilized, as the stitch count required for the filled page could distort delicate fibers.
For baby embroidery projects, always verify that the back of the embroidery is smooth or covered, as dense fill areas can be abrasive against sensitive skin. This design works best on medium-weight woven fabrics like quilting cotton, denim, twill, or canvas where the structural integrity supports the design's complexity.
Customization and Commercial Viability
The true strength of the Back to School Notebook lies in its adaptability for design assets. For digital product sellers offering customizable listings, this template streamlines production. However, users must verify licensing terms before selling finished goods or modified files. Assuming commercial rights are secured, this design serves as a versatile foundation for various niches beyond standard school supplies.
I envision this working exceptionally well for teacher planners, homeschooling organization kits, or even boutique branding for stationery shops. When creating printable mockups for online listings, ensure the digital representation accurately reflects the stitched texture. Misleading mockups erode customer trust. In my testing, the design maintained clarity when scaled within reasonable limits, but I advise checking specific hoop size constraints. Resizing a complex template too drastically can alter stitch density and cause registration issues between the notebook lines and the apple accents. Always re-digitize or adjust compensation if scaling beyond 10-15% of the original size.
Technical Notes for Professional Results
Experienced makers know that successful embroidery projects depend on preparation. Before running the Back to School Notebook on a final product, adhere to these professional guidelines:
- Thread Color Contrast: Test your name color against the notebook background. Low contrast combinations (e.g., yellow text on cream paper) reduce readability. High contrast ensures the personalization pops.
- Stitch Order Verification: Confirm the digitizer has sequenced the design logically. The notebook background should stitch before the border elements and personalization to prevent framing issues.
- Needle Selection: Use a sharp needle for woven fabrics to pierce cleanly through fill areas. For knits, a ballpoint needle prevents fiber damage. Change needles frequently when stitching dense fill sections to avoid skipped stitches.
- Bobbin Tension Check: Large fill areas can reveal bobbin tension issues. Ensure your machine is properly calibrated before starting a sweatshirt embroidery or tote bag run to avoid visible bobbin thread on top.
- Mockup Testing: Create black and white versions of your design preview to check value contrast. If the design looks muddy in grayscale, it will lack definition in thread form regardless of color choices.
Elevating Handmade Products Through Thoughtful Design
Ultimately, the Back to School Notebook represents more than just seasonal decor; it is a functional tool for creators who understand that great embroidery solves problems. By providing a structured, aesthetically pleasing template for personalization, it bridges the gap between artistic expression and commercial practicality. Whether you are an Etsy seller looking to expand your autumn catalog, a hobbyist making gifts for grandchildren, or a small shop product developer creating branded merchandise, this design offers reliable performance when used correctly.
Success with this machine embroidery design comes down to respecting the technical requirements of the medium. Pay attention to stabilizer choices, fabric compatibility, and proper scaling. When executed with care, the Back to School Notebook transforms ordinary items into cherished, personalized keepsakes that resonate with buyers and recipients alike. It stands as a testament to how thoughtful digitizing can elevate the entire category of Back To School embroidered goods, proving that even traditional themes can feel fresh and professionally relevant in today’s handmade marketplace.